Termite damage and carpenter ant activity rarely announce themselves in a dramatic way. More often, a homeowner notices a few discarded wings on a windowsill, a bit of frass near a trim board, or a soft spot that seems too small to matter. That is usually the moment when a minor-looking issue starts quietly becoming a much more expensive one.
What makes these pests tricky is that the visible clue is often not the whole problem. A stain, gap, or piece of damaged wood may be showing up far away from the actual colony or nest. That’s one reason contractors and pest control contractors tend to look beyond the obvious surface damage first. They are checking moisture, wood-to-soil contact, hidden entry points, and whether an older home has the kind of conditions these pests use to stay active year after year.
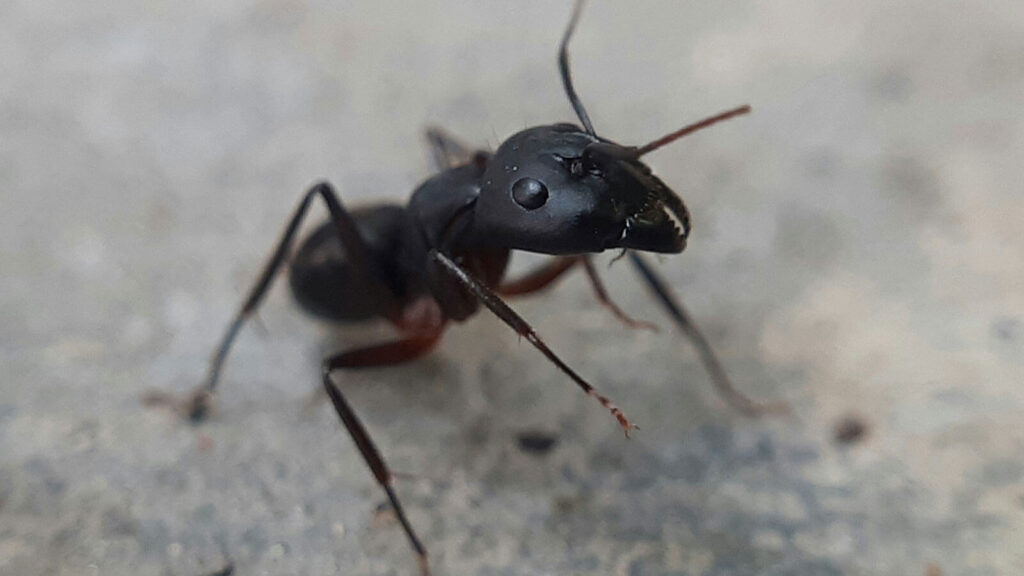
Why termite and carpenter ant problems are easy to miss
Hudson Valley homes give pests more hiding places than many owners realize. Older framing, additions built at different times, unfinished basements, stone foundations, attached porches, weathered trim, and long-neglected crawl spaces all create small pockets where insects can work unnoticed. A home can look sound from the driveway and still have damp sill plates, buried siding, or soft fascia boards that are quietly inviting trouble.
Termites and carpenter ants do not damage wood in the same way, but homeowners often discover both through the same pattern: a small clue, then a bigger hidden problem. Carpenter ants usually signal moisture or decay first. Termites can be more directly destructive, especially when they’ve had time to spread in structural members that are not checked regularly.
The mistake many people make is assuming visible damage equals the full extent of the issue. In practice, the opposite is often true. The visible area may be the easiest-to-see part of a broader moisture or access problem. That is why a fast cosmetic repair alone tends to fail. If the conditions remain, the pests return.
Warning signs that deserve attention
Some signs are obvious, while others are easy to dismiss as “old house stuff.” The problem is that termites and carpenter ants often start in exactly those overlooked areas.
- Swarming insects indoors, especially near windows or light fixtures
- Discarded wings near sills, baseboards, or door frames
- Small piles of sawdust-like material or coarse frass
- Soft, blistering, or hollow-sounding wood
- Paint that bubbles for no clear reason
- Trim or fascia boards that seem to decay faster than expected
- Rustling sounds inside walls, especially at night
- Moisture problems in basements, crawl spaces, or around additions
One counterintuitive thing homeowners often miss: the pest issue is sometimes easier to spot than the moisture problem that caused it. If an ant trail keeps showing up in one area, or if a section of wood keeps softening after repeated patching, the real issue may be water intrusion, poor ventilation, or drainage. Fixing the insect problem without solving that underlying condition is usually temporary.
What contractors usually inspect first
Good inspectors do not start by chasing the insect itself. They start by asking why the home became attractive to pests in the first place. That usually means looking at the building envelope, the drainage pattern around the house, and the condition of the wood that stays damp the longest.
Typical first checks include:
- Basement or crawl space humidity
- Sill plates and rim joists
- Window and door trim
- Fascia, soffits, and roof-edge details
- Deck posts, porch framing, and stair stringers
- Gaps where siding meets masonry or foundation walls
- Leaking gutters or downspouts dumping water near the house
This is where a lot of DIY advice falls short. A homeowner may seal a crack, spray a visible trail, and assume the issue is handled. But if a downspout is emptying next to the foundation, or if spring runoff keeps soaking one side of the house, the pests are only responding to the environment already there. If moisture conditions are also causing other exterior problems, it can make sense to review spring drainage problems around Hudson Valley homes and the kinds of exterior damage that can create pest entry points before patching over the symptoms.
Why Hudson Valley homes are especially vulnerable
Regional conditions matter. Freeze-thaw cycles open small gaps in trim and siding. Heavy rains expose drainage problems fast. Mature trees can hold shade and moisture around rooflines and exterior walls. In neighborhoods with older homes, you also see more original framing, aging window assemblies, and repairs that were done in layers over decades rather than as a single system.
That combination creates ideal conditions for hidden insect activity. A house may have older wood that is still structurally serviceable, but if it’s repeatedly exposed to moisture, pests will find the weakest points first. Detached garages, porches, workshops, and additions are frequent trouble spots because they are often maintained less consistently than the main house.
In Dutchess County and Putnam County especially, homeowners often underestimate how much a slightly damp basement or a poorly ventilated crawl space can matter. In Westchester, where homes may sit closer together and have more complex additions or renovation histories, access points can be just as important as moisture. For residents who want local support, it’s worth knowing where to find Dutchess County pest control services, pest control contractors in Putnam County, or Westchester County pest control help when the warning signs start showing up.
DIY fixes that often make the problem worse
It is tempting to caulk a gap, paint over damaged trim, or replace a visibly chewed board and move on. Sometimes that buys time. Often it just hides the evidence long enough for the real damage to spread.
These are the mistakes that tend to backfire:
- Sealing over damaged wood without checking the source of moisture
- Replacing trim but leaving soil, mulch, or decking in contact with vulnerable framing
- Using store-bought sprays as the only treatment
- Ignoring attic, crawl space, or basement conditions because the problem seems “outside”
- Waiting until swarming season ends before taking action
Another common misconception is that a clean-looking home is less likely to have pest issues. That is not always true. Carpenter ants and termites are good at taking advantage of homes that look fine on the surface but have a hidden moisture problem behind the scenes. The more finished the space is, the easier it can be to miss early damage.
When the repair is bigger than it looks
Once pests have been active long enough to affect framing, the question shifts from treatment to repair planning. This is where homeowners can get surprised by scope. A small repair might start with trim or sheathing, but contractors often discover damaged insulation, compromised vapor barriers, rotted substructure, or secondary moisture intrusion that has been building for years.
That is also why rushed patch jobs tend to disappoint. If a section of siding was opened to treat a problem and the flashing, wrap, or drainage details were never corrected, the same area can fail again. Cheap repairs are usually cheapest only once. Then they become repeat work.
In practical terms, the right order matters:
- Identify the pest and the extent of activity
- Find the moisture source or entry point
- Confirm whether wood is structurally damaged
- Repair the building detail that allowed the issue to persist
- Treat the affected area appropriately so the problem does not return
That sequence is boring, but it saves money. It also avoids the common homeowner frustration of paying for the same area twice.
What to do before calling a contractor
You do not need to diagnose everything yourself, but it helps to gather a few details before you bring in help. That can make the inspection more productive and reduce the odds of missing something important.
- Note where you saw wings, frass, or activity
- Check whether the area gets damp after rain
- Look for leaking gutters or blocked downspouts
- See whether mulch, soil, or decking touches wood trim
- Take photos before cleaning anything up
- Pay attention to swarming season timing
If the issue is isolated to a small surface area, that is useful. If it keeps returning after cleaning, painting, or spot treatment, that is even more useful. Repeated recurrence is often the clue that the problem is structural or moisture-related, not just insect-related.
How to protect the house long term
Prevention is less dramatic than treatment, but it is where the real savings usually happen. The most effective long-term protection is not a single product or spray. It is a combination of moisture control, regular exterior maintenance, and prompt repair of the details that stay wet the longest.
That means keeping gutters clear, extending downspouts away from the foundation, watching grading around the house, and replacing compromised trim before decay spreads. It also means not ignoring small changes in the basement or crawl space. A faint musty smell, seasonal dampness, or one corner that never quite dries out can be the start of a bigger pattern.
For homeowners comparing options, local guidance matters. A contractor who understands older Hudson Valley homes will usually pay close attention to drainage, foundation materials, and how past repairs were layered together. That kind of judgment is often what separates a short-term fix from a repair that actually lasts.
Frequently Asked Questions
How can I tell termite damage from carpenter ant damage?
Termites usually leave finer, more uniform damage and may produce mud tubes or swarmers. Carpenter ants often leave coarser frass and are linked to damp or decaying wood. In real homes, though, the distinction is not always obvious without an inspection.
Are discarded wings always a sign of termites?
No, but they are a strong reason to look closer. Wings near windows, sills, or light fixtures can come from termites or other swarming insects. The pattern and timing matter more than one isolated clue.
Should I just spray the area myself?
Spray may reduce visible activity, but it rarely solves the cause. If moisture, wood decay, or hidden nesting remains, the problem can return. DIY spray is usually not the full answer.
Why do these problems keep showing up in the same place?
Because the same conditions keep coming back. Leaks, poor drainage, damaged trim, and trapped moisture create repeat targets. Until the condition changes, the pests often do too.
Is a small soft spot in trim something to worry about?
Yes. Small soft spots are often where the real issue is starting, especially around windows, fascia, or lower wall sections. The repair is usually easier before the wood loses more strength.
When should I bring in a professional?
Bring in a professional as soon as you see repeated swarming, structural damage, or signs that the issue is connected to moisture or hidden decay. The earlier the inspection, the less likely you are to end up with a larger repair scope.
If you are seeing signs of termite or carpenter ant activity, the best next step is a careful inspection from a local pro who can look at the home as a system, not just the insect. That approach is usually what prevents the expensive surprise later.